The complete listing of Chinese prototype models is below. For model reviews, please scroll below the table or click here
The complete listing of Chinese prototype models is below. For model reviews, please scroll below the table or click here
The complete listing of Chinese prototype models is below. For model reviews, please scroll below the table or click here
The complete listing of Chinese prototype models is below. For model reviews, please scroll below the table or click here
N27
8G
1:87 Scale

Rating
9.5/10
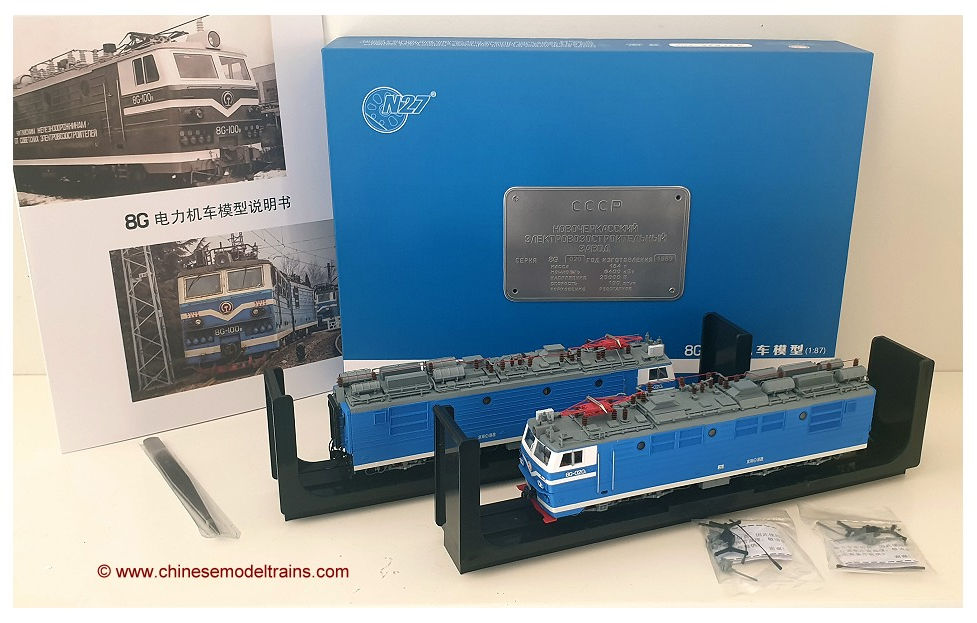
Novocherkassk 8G Class Bo-Bo+Bo-Bo
Prototype Information
The 8G electric locomotives are a double unit Bo-Bo electric locomotive built by Novocherkassk Electric Locomotive Plant in the Soviet Union between 1987 and 1990. 100 units were built and they were based on the VL80 family of locomotives (specifically VL80S), of which almost 5000 units were built.
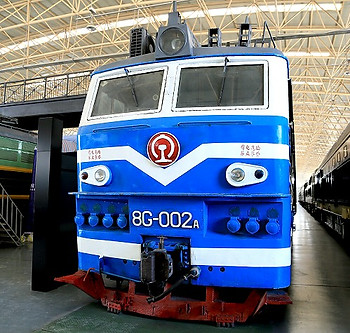
They were a successful class of locomotive and used in heavy freight service, rated at 8600hp and capable of 100kph. The class was based at Taiyuan and Beijing and the last units from Tiayuan were retired in late 2014. Two examples have been preserved, one at the Beijing Railway museum (right) and the other at Taiyuan locomotive depot. They all had a blue and white or dark blue and white livery.
General Information
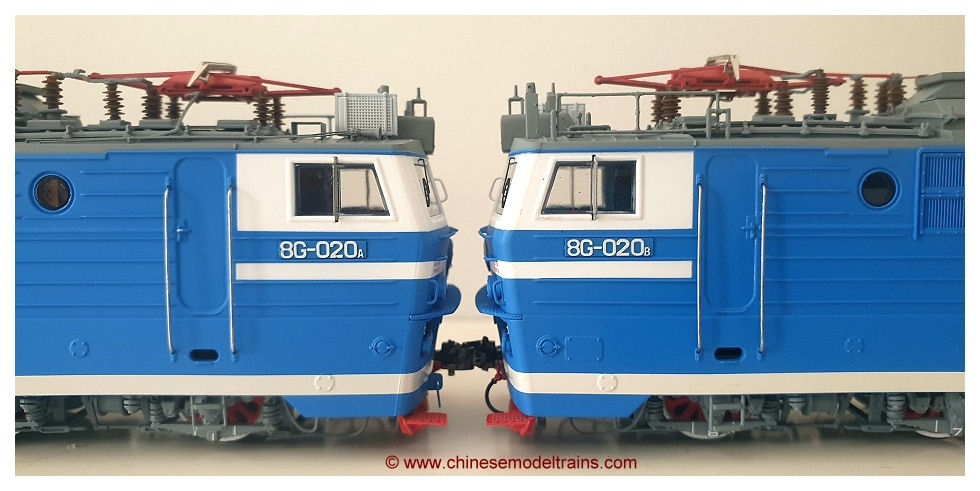
The 8G's are a twin electric locomotive design. These were the second 8G to be manufactured, the first by CMR Line (untested). The N27's version is a bit heavy on the wallet, but you do get an incredible amount of locomotive for your money. Each unit is identical and has a plastic body shell with heavy alloy frame and absolutely plastered with brass and plastic detail parts. Each unit is powered. Together, they weight an impressive 1268 grams! The units are simply coupled together rather via a permanent or semi-permanent draw bar system.

Packaging
The 8G's are very well packaged. The outer box is a thick two-piece cardboard box. The outer lid has a replica builders plate bolted on. If you are storing this model with other boxes, I recommend removing it to prevent damage to other boxes. Inside the box has foam sheets and foam block with cutouts to support the model. Each locomotive unit is wrapped in a thin plastic sheet and screwed onto a plastic cradle. They are easy to remove, but a little more complicated to put back, due to the incredible amount of roof details. The best way to do this is pinch the sides of the model upside down, position the two metal cylinders over the mounting holes on the frame, then lower the cradle over the metal cylinders and screw in place. The box has a nice large instruction/schematic sheet, add on parts with spare m.u. cables, sanding pipes etc and a pair of tweezers to apply said parts.
Details
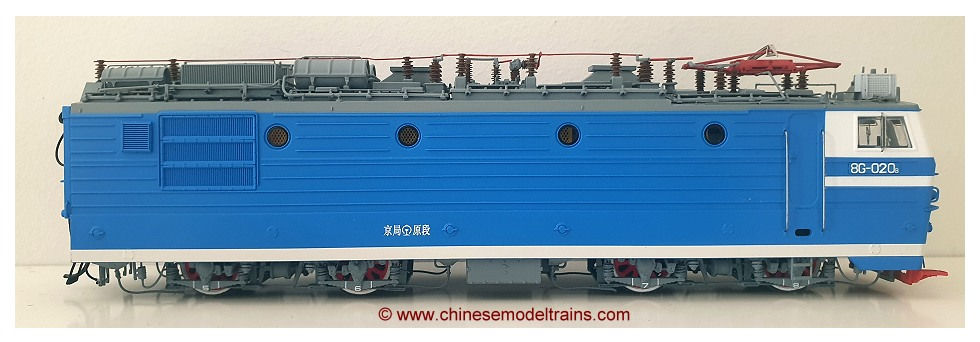
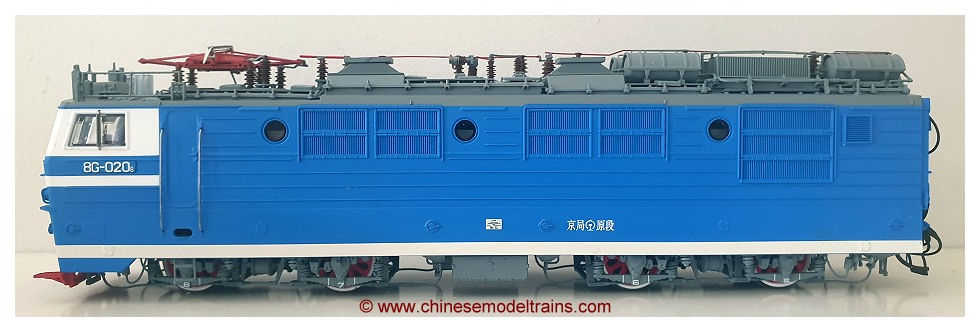
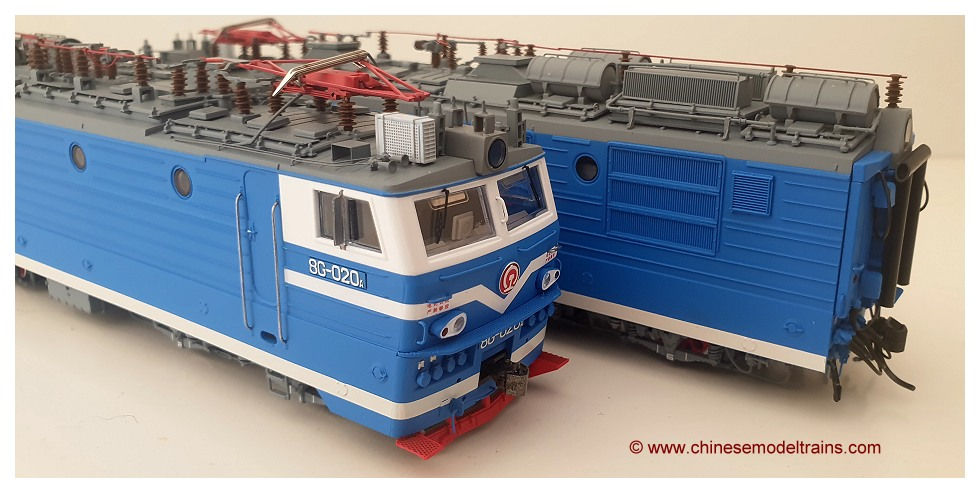
The details on this model are simply breathtaking and it is quite possibly the best plastic model I have seen to date. It is quite unlike anything that ran on China's network, riding low to the rails with the wheels riding partially into the body with a crazy amount of components mounted to the roof. The basic body shells are injection molded plastic with very sharp edges and fine body ribbing. The louver vents, also plastic are gorgeous with terrific depth and fine lines.

The paint work is beautifully applied, although one of my units has a factory blemish on one of the headlights as seen above and fortunately will be a very easy repair with some white paint. The white and blue sections are extremely sharp with no fuzz. Lettering is equally very sharp. The number plates and factory plates are all separately applied parts with embossed characters on the former.

The details on the roof are what sets these models apart. They feature an air conditioning compressor, four air reservoir tanks with roof guards & associated plumbing, brake resistor grids, equipment boxes, insulators, aerials/broadcasting equipment, walkways, hatches, panels, air horns and a very beautifully made and functional pantograph system. These are all made up from a mixture of wire, plastic and brass parts and it is absolutely stunning. The main panel between the pantograph and air reservoirs is removable, as mentioned below to access the DCC plug and care should be taken to prevent damage to the red power cables. They feed into some grey plastic insulator caps which have a tendency to pop off and it's quite a job putting them back together.

The wheels are chemically darkened steel with very low flanges and are a hollowed out Boxpok design. They are painted in typical red centers with white edges and look really cool - although partially hidden. The bogies, again mostly hidden are superbly done with each wheel numbered as per prototype. The springs are individual parts. They are very different to Chinese type bogies with the brake rigging and cylinders riding between the wheels. Sand pipes are made from a fairly flexible plastic and look great sitting permanently behind each of the wheels.

The interior is fully detailed with computer screens, seats and controls. There are plenty of separately applied metal handrails and grab irons and all are color coded in white, blue or bare metal as the real units. Side mirrors, windscreen wipers and air horns are all separate parts. The front and rear have a number of m.u. (multiple unit) ports. The rearmost have the m.u. cables fixed to one end with plastic pins to plug into the other unit. This is where you will have to make a big decision on how you run the models. The m.u. cables look incredible but are extremely difficult to install into the other unit. If you are storing the models in the box, it is very impractical to constantly unplug each one. If you are keeping the model on a layout or on display, I would recommend using the permanent drawbar system to prevent this from happening. Note, this would make the box unusable as it is designed to hold each unit separately. If you prefer to keep the models separate, you could either remove the cables altogether, or cheat a bit like I did and plug the cables into same unit! This keeps them from dragging on the rails and you somewhat still get the impression of the cables being there. There are a couple of spares included if you happen to damage one. The brake pipe air hoses next to the coupler are black with a red tap, unfortunately one of mine had fallen out when I took the photos (the other can be seen in the bottom photo).
Electronics
The lighting suite is excellent and features cab lighting, engine room lights, pale blue main front and rear headlights, a pair of pale yellow front marker lights and on each end of the unit, a single red marker and blue marker (Russian practice?). The LED in the rear most head light is very visible, but hardly noticeable when paired up or when illuminated. In DC mode the lighting is directional and some can be individually turned off via little switches on the dummy 21 pin DCC plug. The DCC plug is accessible two ways, either by removing the body shell or via the center most roof hatch (just behind the pantographs. This is held on with three small clips, two at the front and one at the back and it can be gently lifted from the back. The plug sits conveniently on top of the circuit board and is a very easy process.
Performance
Each unit is powered and heavily weighted. Electric pick up is taken from all wheels. The wheels have nice shallow flanges and will happily run on code 75 rail. The motors and gear box are dead silent on my example and both are equipped with heavy brass fly wheels to eliminate sudden drop outs. The speed range is superb and can be run extremely slowly up to a decent top speed. The end result is an absolutely flawless drive system.

Coupler Conversion
The black plastic knuckles couplers on the front are easily removed by removing the single screw on underneath the coupler box and sliding the box out. The coupler box separates and a #58, 158 (or #5) are a drop in fit. The front ones are unfortunately more difficult to swap out, to the point where I've given up for the time being looking for a replacement. They are a black plastic knuckle coupler type with a two pronged end attached to a spring. The setup works well to keep the locomotives together, but I do prefer having metal couplers for my locomotives - particularly on such a beast of a locomotive which is just begging to handle huge trains. The accessories bags include a pair of drawbars if you wish to keep the units together.